Fonts
In LittlevGL fonts are collections of bitmaps and other information required to render the images of the letters (glyph). A font is stored in a lv_font_t variable and can be set in style’s text.font field. For example:
my_style.text.font = &lv_font_roboto_28; /*Set a larger font*/
The fonts have a bpp (bits per pixel) property. It shows how many bits are used to describe a pixel in the font. The value stored for a pixel determines the pixel’s opacity. This way, with higher bpp, the edges of the letter can be smoother. The possible bpp values are 1, 2, 4 and 8 (higher value means better quality).
The bpp also affects the required memory size to store the font. For example, bpp = 4 makes the font nearly 4 times greater compared to bpp = 1.
Unicode support
LittlevGL supports UTF-8 encoded Unicode characters.
You need to configure your editor to save your code/text as UTF-8 (usually this the default) and be sure that, LV_TXT_ENC is set to LV_TXT_ENC_UTF8 in lv_conf.h. (This is the default value)
To test it try
lv_obj_t * label1 = lv_label_create(lv_scr_act(), NULL);
lv_label_set_text(label1, LV_SYMBOL_OK);
If all works well, a ✓ character should be displayed.
Built-in fonts
There are several built-in fonts in different sizes, which can be enabled in lv_conf.h by LV_FONT_… defines:
LV_FONT_ROBOTO_1212 pxLV_FONT_ROBOTO_1616 pxLV_FONT_ROBOTO_2222 pxLV_FONT_ROBOTO_2828 px
The built-in fonts are global variables with names like lv_font_roboto_16 for 16 px hight font. To use them in a style, just add a pointer to a font variable like shown above.
The built-in fonts have bpp = 4, contains the ASCII characters and uses the Roboto font.
In addition to the ASCII range, the following symbols are also added to the built-in fonts from the FontAwesome font.
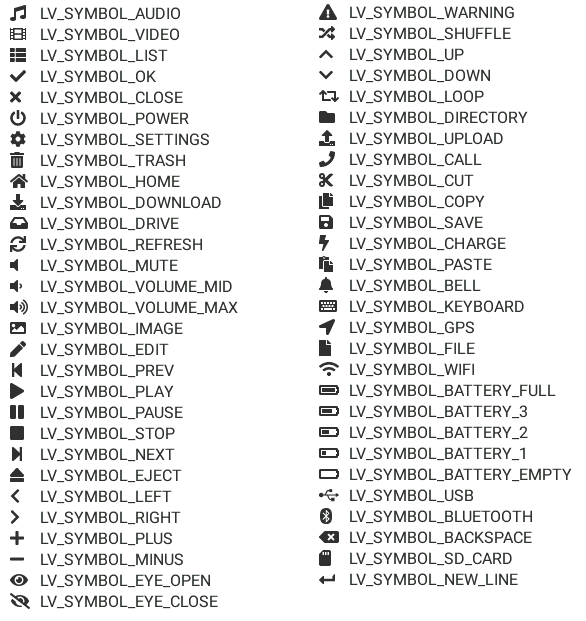
The symbols can be used as:
lv_label_set_text(my_label, LV_SYMBOL_OK);
Or with together with strings:
lv_label_set_text(my_label, LV_SYMBOL_OK "Apply");
Or more symbols together:
lv_label_set_text(my_label, LV_SYMBOL_OK LV_SYMBOL_WIFI LV_SYMBOL_PLAY);
Special features
Bidirectional support
Most of the languages use Left-to-Right (LTR for short) writing direction, however some languages (such as Hebrew) uses Right-to-Left (RTL for short) direction.
LittlevGL not only supports RTL texts but supports mixed (a.k.a. bidirectional, BiDi) text rendering too. Some examples:
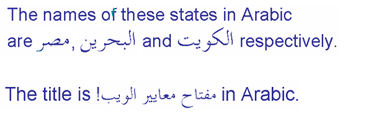
The BiDi support can be enabled by LV_USE_BIDI in lv_conf.h
All texts have a base direction (LTR or RTL) which determines some rendering rules and the default alignment of the text (Left or Right). However, in LittlevGL, base direction is not only for labels. It’s a general property which can be set for every object. If unset then it will be inherited from the parent. So it’s enough to set the base direction of the screen and every object will inherit it.
The default base direction of screen can be set by LV_BIDI_BASE_DIR_DEF in lv_conf.h.
To set an object’s base direction use lv_obj_set_base_dir(obj, base_dir). The possible base direction are:
LV_BIDI_DIR_LTR: Left to Right base directionLV_BIDI_DIR_RTL: Right to Left base directionLV_BIDI_DIR_AUTO: Auto detect base directionLV_BIDI_DIR_INHERIT: Inherit the base direction from the parent (default for non-screen objects)
This list summarizes the effect of RTL base direction on objects:
Create objects by default on the right
lv_tabview: displays tabs from right to leftlv_cb: Show the box on the rightlv_btnm: Show buttons from right to leftlv_list: Show the icon on the rightlv_ddlist: Align the options to the rightThe texts in
lv_table,lv_btnm,lv_kb,lv_tabview,lv_ddlist,lv_rollerare processed to display correctly with RTL parts too
Subpixel rendering
Subpixel rendering means to increase the horizontal resolution by rendering on Red, Green and Blue channel instead of pixel level. It results in higher quality letter anti-alaising.
Subpixel rendering requires to generate the fonts with special settings:
In the online converter tick the
SubpixelboxIn the command line tool use
--lcdflag. Note that the generated font needs about 3 times more memory.
Subpixel rendering works only if the color channels of the pixels have a horizontal layout. That is the R, G, B channels are next eachother and not above eachother.
The order of color channels also needs to match with the library settings. By default the LittlevGL assumes RGB order, however it can ba swapped by setting LV_SUBPX_BGR 1 in lv_conf.h.
Compress fonts
The bitmaps of the fonts can be compressed by
ticking the
Compressedcheck box in the online converternot passing
--no-compressflag to the offline converter (applies compression by default)
The compression is more effective with larger fonts and higher bpp. However, it’s about 30% slower to render the compressed fonts. Therefore it’s recommended to compress only the largest fonts of user interface, because
they need the most memory
they can be compressed better
and probably they are used less frequently then the medium sized fonts. (so performance cost is smaller)
Add new font
There are several ways to add a new font to your project:
The simplest method is to use the Online font converter. Just set the parameters, click the Convert button, copy the font to your project and use it. Be sure to carefully read the steps provided on that site or you will get an error while converting.
Use the Offline font converter. (Requires Node.js to be installed)
If you want to create something like the built-in fonts (Roboto font and symbols) but in different size and/or ranges, you can use the
built_in_font_gen.pyscript inlvgl/scripts/built_in_fontfolder. (It requires Python andlv_font_convto be installed)
To declare the font in a file, use LV_FONT_DECLARE(my_font_name).
To make the fonts globally available (like the builtin fonts), add them to LV_FONT_CUSTOM_DECLARE in lv_conf.h.
Add new symbols
The built-in symbols are created from FontAwesome font.
Search symbol on https://fontawesome.com. For example the USB symbol. Copy it’s Unicode ID which is
0xf287in this case.Open the Online font converter. Add Add FontAwesome.woff. .
Set the parameters such as Name, Size, BPP. You’ll use this name to declare and use the font in your code.
Add the Unicode ID of the symbol to the range field. E.g.
0xf287for the USB symbol. More symbols can be enumerated with,.Convert the font and copy it to your project. Make sure to compile the .c file of your font.
Declare the font using
extern lv_font_t my_font_name;or simplyLV_FONT_DECLARE(my_font_name);.
Using the symbol
Convert the Unicode value to UTF8. You can do it e.g on this site. For
0xf287the Hex UTF-8 bytes areEF 8A 87.Create a
definefrom the UTF8 values:#define MY_USB_SYMBOL "\xEF\x8A\x87"Create a label and set the text. Eg.
lv_label_set_text(label, MY_USB_SYMBOL)
Note - lv_label_set_text(label, MY_USB_SYMBOL) searches for this symbol in the font defined in style.text.font properties. To use the symbol you may need to change it. Eg style.text.font = my_font_name
Add a new font engine
LittlevGL’s font interface is designed to be very flexible. You don’t need to use LittlevGL’s internal font engine but, you can add your own. For example, use FreeType to real-time render glyphs from TTF fonts or use an external flash to store the font’s bitmap and read them when the library needs them.
To do this a custom lv_font_t variable needs to be created:
/*Describe the properties of a font*/
lv_font_t my_font;
my_font.get_glyph_dsc = my_get_glyph_dsc_cb;        /*Set a callback to get info about gylphs*/
my_font.get_glyph_bitmap = my_get_glyph_bitmap_cb;  /*Set a callback to get bitmap of a glyp*/
my_font.line_height = height;                       /*The real line height where any text fits*/
my_font.base_line = base_line;                      /*Base line measured from the top of line_height*/
my_font.dsc = something_required;                   /*Store any implementation specific data here*/
my_font.user_data = user_data;                      /*Optionally some extra user data*/

...

/* Get info about glyph of `unicode_letter` in `font` font.
 * Store the result in `dsc_out`.
 * The next letter (`unicode_letter_next`) might be used to calculate the width required by this glyph (kerning)
 */
bool my_get_glyph_dsc_cb(const lv_font_t * font, lv_font_glyph_dsc_t * dsc_out, uint32_t unicode_letter, uint32_t unicode_letter_next)
{
    /*Your code here*/

    /* Store the result.
     * For example ...
     */
    dsc_out->adv_w = 12;        /*Horizontal space required by the glyph in [px]*/
    dsc_out->box_h = 8;         /*Height of the bitmap in [px]*/
    dsc_out->box_w = 6;         /*Width of the bitmap in [px]*/
    dsc_out->ofs_x = 0;         /*X offset of the bitmap in [pf]*/
    dsc_out->ofs_y = 3;         /*Y offset of the bitmap measured from the as line*/
    dsc_out->bpp   = 2;         /*Bits per pixel: 1/2/4/8*/

    return true;                /*true: glyph found; false: glyph was not found*/
}

/* Get the bitmap of `unicode_letter` from `font`. */
const uint8_t * my_get_glyph_bitmap_cb(const lv_font_t * font, uint32_t unicode_letter)
{
    /* Your code here */

    /* The bitmap should be a continuous bitstream where
     * each pixel is represented by `bpp` bits */

    return bitmap;    /*Or NULL if not found*/
}