Getting Started
LVGL Basics
LVGL (Light and Versatile Graphics Library) is a free and open-source graphics library providing everything you need to create an embedded GUI with easy-to-use mobile-phone-like graphical elements, beautiful visual effects, and a low memory footprint.
How does it do this?
Overview of LVGL's Data Flow
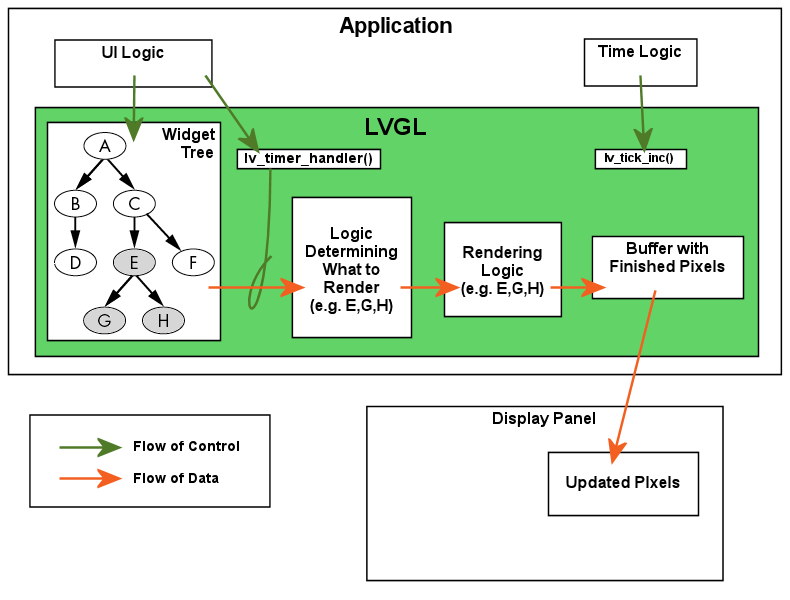
Overview of LVGL Data Flow
You add LVGL to your project, provide it with inputs and the method for pixels to flow to the display panel(s), connect the Tick Interface so LVGL can tell what time is it, periodically call Timer Handler, build one or more Widget Trees for LVGL to render the interactive UI, and let LVGL do the rest.
The Timer Handler function drives LVGL's timers which, in turn, perform a number of periodic tasks:
refresh display(s),
read input devices,
fire events based on user input (and other things),
run any animations, and
run user-created timers.
Application's Job
After initialization, the application's job is merely to create Widget Trees when they are needed, manage events those Widgets generate (through user interactions and similar), and delete them when they are no longer needed. LVGL takes care of the rest.
Major Concepts
Display vs Screen
Before we get into any details about Widgets, let us first clarify the difference between two terms that you will hereafter see frequently:
A Display or Display Panel is the physical hardware displaying the pixels.
A Display (lv_display) object is an object in RAM that represents a Display LVGL will render to.
Screen objects are the "root" Widgets in the Widget Trees mentioned above, and each Screen is "attached to" a particular Display (lv_display).
Default Display
When the first Display (lv_display) object is created, it becomes the Default Display. Many functions related to Screen Widgets use the default display. See Default Display for more information.
Screen Widgets
In this documentation, the term "Screen Widget" is frequently shortened to just "Screen". A "Screen" is simply any Widget created without a parent — the "root" of each Widget Tree.
See Screens for more details.
Active Screen
The Active Screen is the screen (and its child Widgets) currently being displayed. See Active Screen for more information.
Widgets
After LVGL is initialized (see Initializing LVGL), an application creates a tree of Widgets that LVGL can render to the associated display to create a user interface with which the user can interact.
Widgets are "intelligent" LVGL graphical elements such as Base Widget (simple rectangles and Screens), Buttons, Labels, Checkboxes, Switches, Sliders, Charts, etc. See All Widgets to see the full list.
To build this Widget Tree, the application first acquires a pointer to a Screen Widget. You are free to use the default Screen created with the Display (lv_display) and/or create your own. To create a new Screen Widget, simply create a Widget with NULL as the parent argument. Technically, this can be any type of Widget, but in most cases it is a Base Widget (lv_obj). (An example of another type of Widget sometimes used as a Screen is an Image (lv_image) Widget to supply an image for the background.)
The application then adds Widgets to this Screen which are children in its tree. Widgets are automatically added as children to their parent Widgets at time of creation — the Widget's parent is passed as the first argument to the function that creates the Widget. After being added, we say that the parent Widget "contains" the child Widget.
Any Widget can contain other Widgets. For example, if you want a Button to have text, create a Label Widget and add it to the Button as a child.
Each child Widget becomes "part of" its parent Widget. Because of this relationship:
when the parent Widget moves, its children move with it;
when the parent Widget is deleted, its children are deleted with it;
a child Widget is only visible within its parent's boundaries; any part of a child outside its parent's boundaries is clipped (i.e. not rendered).
Screens (and their child Widgets) can be created and deleted at any time except
when the Screen is the Active Screen. If you want to delete the current Screen
as you load a new one, call lv_screen_load_anim() and pass true for the
auto_del argument. If you want to keep the current Screen in RAM when you load a
new Screen, pass false instead, or call lv_screen_load() to load the
new screen.
You are free to keep any number of Screens (and their child Widgets) in RAM (e.g. for quick re-display again later). Doing so:
requires more RAM,
avoids repeatedly creating the Screen and its child Widgets, and
can be handy when a Screen is complex and/or can be made the Active Screen frequently.
If multiple Screens are maintained in RAM simultaneously, it is up to you how they are managed.
Creating Widgets
Widgets are created by calling functions that look like this:
lv_<type>_create(parent)
The call will return an lv_obj_t* pointer that can be used later to reference the Widget to set its attributes.
Example:
lv_obj_t * slider1 = lv_slider_create(lv_screen_active());
Modifying Widgets
Attributes common to all Widgets are set by functions that look like this:
lv_obj_set_<attribute_name>(widget, <value>)
Example:
lv_obj_set_x(slider1, 30);
lv_obj_set_y(slider1, 10);
lv_obj_set_size(slider1, 200, 50);
All such functions are covered in Common Widget Features.
Along with these attributes, widgets can have type-specific attributes which are set by functions that look like this:
lv_<type>_set_<attribute_name>(widget, <value>)
Example:
lv_slider_set_value(slider1, 70, LV_ANIM_ON);
To see the full API for any Widget, see its documentation at All Widgets, study its related header file in the source code, e.g.
lvgl/src/widgets/slider/lv_slider.h
or view it on GitHub, e.g.
Deleting Widgets
To delete any widget and its children:
lv_obj_delete(lv_obj_t * widget)
Events
Events are used to inform the application that something has happened with a Widget. You can assign one or more callbacks to a Widget which will be called when the Widget is clicked, released, dragged, being deleted, etc.
A callback is assigned like this:
lv_obj_add_event_cb(btn, my_btn_event_cb, LV_EVENT_CLICKED, NULL);

...

void my_btn_event_cb(lv_event_t * e)
{
    printf("Clicked\n");
}
LV_EVENT_ALL can be used instead of LV_EVENT_CLICKED
to invoke the callback for all events. (Beware: there are a LOT of events! This can
be handy for debugging or learning what events occur for a given Widget or if, for
some reason, the application needs to process all events.)
Event callbacks receive the argument lv_event_t * e containing the current event code and other event-related information. The current event code can be retrieved with:
lv_event_code_t code = lv_event_get_code(e);
The Widget that triggered the event can be retrieved with:
lv_obj_t * widget = lv_event_get_target(e);
Learn all about Events in the Events section.
Parts
Widgets are built from one or more parts. For example, a button
has only one part called LV_PART_MAIN. However, a
Slider (lv_slider) has LV_PART_MAIN, LV_PART_INDICATOR
and LV_PART_KNOB.
By using parts you can apply different styles to sub-elements of a widget.
Read the Widget's documentation to learn which parts it uses.
States
Widgets can be in a combination of the following states:
LV_STATE_DEFAULT: Normal, released stateLV_STATE_CHECKED: Toggled or checked stateLV_STATE_FOCUSED: Focused via keypad or encoder or clicked via touchpad/mouseLV_STATE_FOCUS_KEY: Focused via keypad or encoder but not via touchpad/mouseLV_STATE_EDITED: Edited by an encoderLV_STATE_HOVERED: Hovered by mouseLV_STATE_PRESSED: Being pressedLV_STATE_SCROLLED: Being scrolledLV_STATE_DISABLED: Disabled
For example, if you press a Widget it will automatically go to the
LV_STATE_FOCUSED and LV_STATE_PRESSED states. When you
release it the LV_STATE_PRESSED state will be removed while the
LV_STATE_FOCUSED state remains active.
To check if a Widget is in a given state use
lv_obj_has_state(widget, LV_STATE_...). It will return true if the
Widget is currently in that state.
To programmatically add or remove states use:
lv_obj_add_state(widget, LV_STATE_...);
lv_obj_remove_state(widget, LV_STATE_...);
Styles
A style instance contains properties such as background color, border width, font, etc. that describe the appearance of Widgets.
Styles are carried in lv_style_t objects. Only their pointer is saved
in the Widgets so they need to be defined as static or global variables. Before
using a style it needs to be initialized with lv_style_init(&style1).
After that, properties can be added to configure the style. For example:
static lv_style_t style1;
lv_style_init(&style1);
lv_style_set_bg_color(&style1, lv_color_hex(0xa03080))
lv_style_set_border_width(&style1, 2))
See Style Properties Overview for more details.
See Style Properties to see the full list.
If a property is not set for the current state, the style with
LV_STATE_DEFAULT will be used. A default value is used if the
property is not defined in the default state.
Some properties (particularly the text-related ones) can be inherited. This means if a property is not set in a Widget it will be searched for in its parents. For example, you can set the font once in the screen's style and all text on that screen will inherit it by default.
Local style properties also can be added to Widgets. This creates a style which resides inside the Widget and is used only by that Widget:
lv_obj_set_style_bg_color(slider1, lv_color_hex(0x2080bb), LV_PART_INDICATOR | LV_STATE_PRESSED);
See Styles for full details.
Themes
Themes are a set of default styles for Widgets. Styles from an active theme are applied automatically when Widgets are created.
The theme for your application is a compile time configuration setting in
lv_conf.h.
MicroPython
LVGL can even be used with MicroPython.
# Initialize
import display_driver
import lvgl as lv

# Create a button with a label
scr = lv.obj()
btn = lv.button(scr)
btn.align(lv.ALIGN.CENTER, 0, 0)
label = lv.label(btn)
label.set_text('Hello World!')
lv.screen_load(scr)
Basic Examples
Below are several basic examples. They include the application code that produces
the Widget Tree needed to make LVGL render the examples shown. Each example assumes
a LVGL has undergone normal initialization, meaning that a lv_display_t object
was created and therefore has an Active Screen.
A very simple hello world label
C code
View on GitHub#include "../lv_examples.h"
#if LV_BUILD_EXAMPLES && LV_USE_LABEL
/**
* Basic example to create a "Hello world" label
*/
void lv_example_get_started_1(void)
{
/*Change the active screen's background color*/
lv_obj_set_style_bg_color(lv_screen_active(), lv_color_hex(0x003a57), LV_PART_MAIN);
/*Create a white label, set its text and align it to the center*/
lv_obj_t * label = lv_label_create(lv_screen_active());
lv_label_set_text(label, "Hello world");
lv_obj_set_style_text_color(lv_screen_active(), lv_color_hex(0xffffff), LV_PART_MAIN);
lv_obj_align(label, LV_ALIGN_CENTER, 0, 0);
}
#endif
Create a slider and write its value on a label
C code
View on GitHub#include "../lv_examples.h"
#if LV_BUILD_EXAMPLES && LV_USE_SLIDER
static lv_obj_t * label;
static void slider_event_cb(lv_event_t * e)
{
lv_obj_t * slider = lv_event_get_target_obj(e);
/*Refresh the text*/
lv_label_set_text_fmt(label, "%" LV_PRId32, lv_slider_get_value(slider));
lv_obj_align_to(label, slider, LV_ALIGN_OUT_TOP_MID, 0, -15); /*Align top of the slider*/
}
/**
* Create a slider and write its value on a label.
*/
void lv_example_get_started_4(void)
{
/*Create a slider in the center of the display*/
lv_obj_t * slider = lv_slider_create(lv_screen_active());
lv_obj_set_width(slider, 200); /*Set the width*/
lv_obj_center(slider); /*Align to the center of the parent (screen)*/
lv_obj_add_event_cb(slider, slider_event_cb, LV_EVENT_VALUE_CHANGED, NULL); /*Assign an event function*/
/*Create a label above the slider*/
label = lv_label_create(lv_screen_active());
lv_label_set_text(label, "0");
lv_obj_align_to(label, slider, LV_ALIGN_OUT_TOP_MID, 0, -15); /*Align top of the slider*/
}
#endif
What's Next?
There are several good ways ways to gain deeper knowledge of LVGL. Here is one recommended order of documents to read and things to play with while you are advancing your knowledge:
If not already read, start with Introduction page of the documentation. (5 minutes)
Check out the Online Demos to see LVGL in action. (3 minutes)
If not already done, read the LVGL Basics (above). (15 minutes)
Set up an LVGL Simulator on PC. (10 minutes)
Have a look at some Examples and their code.
Add LVGL to your project or check out the ready-to-use Projects.
Read the Main Modules pages to get a better understanding of the library. (2-3 hours)
Skim the documentation of All Widgets to see what is available.
If you have questions go to the Forum.
Read the Contributing guide to see how you can help to improve LVGL. (15 minutes)